
AI 3D model generators are not exactly new. There are already many platforms that can generate 3D models from text or images. But for me, the bigger question has never been whether the model looks good on screen.
Can we actually use it?
For people who are into 3D printing, a nice-looking preview is not enough. The model needs to be printable, editable, and useful as a real object. So this time, I want to take a look at Hi3D, previously known as Hitem3D, and go through my actual workflow using it to create a small daily-use item.
Disclosure: This article is written in paid collaboration with Hi3D. However, the workflow and comments are based on my own test using the platform.
What Is Hi3D?

Hi3D is an AI 3D model generation platform. You can upload an image or generate the image from text, and the platform generates a 3D model based on it. This is useful because not everyone can model organic shapes from zero. Even for people who already know CAD, characters, animals, and decorative models can still take a lot of time.
As someone who mainly works with mechanical design, I can model functional parts quite comfortably. But if I need to make something like a cute cat, that is a different type of modeling skill. That is where Hi3D becomes useful.
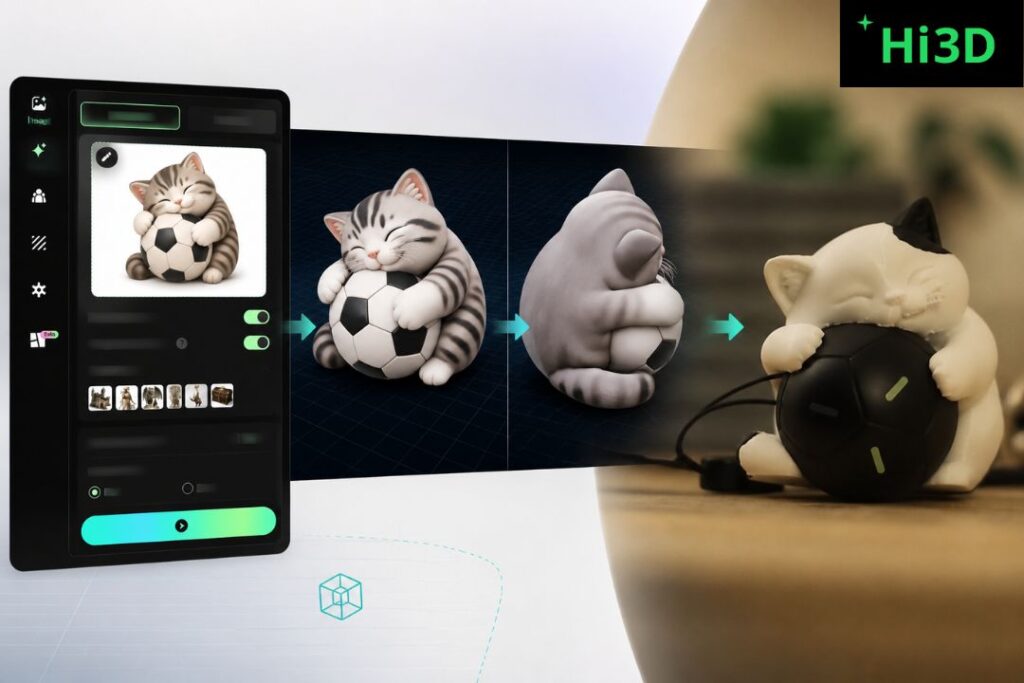
The Project: A Cat Hugging a Ball Tracker
For this test, I used a previous project of mine.
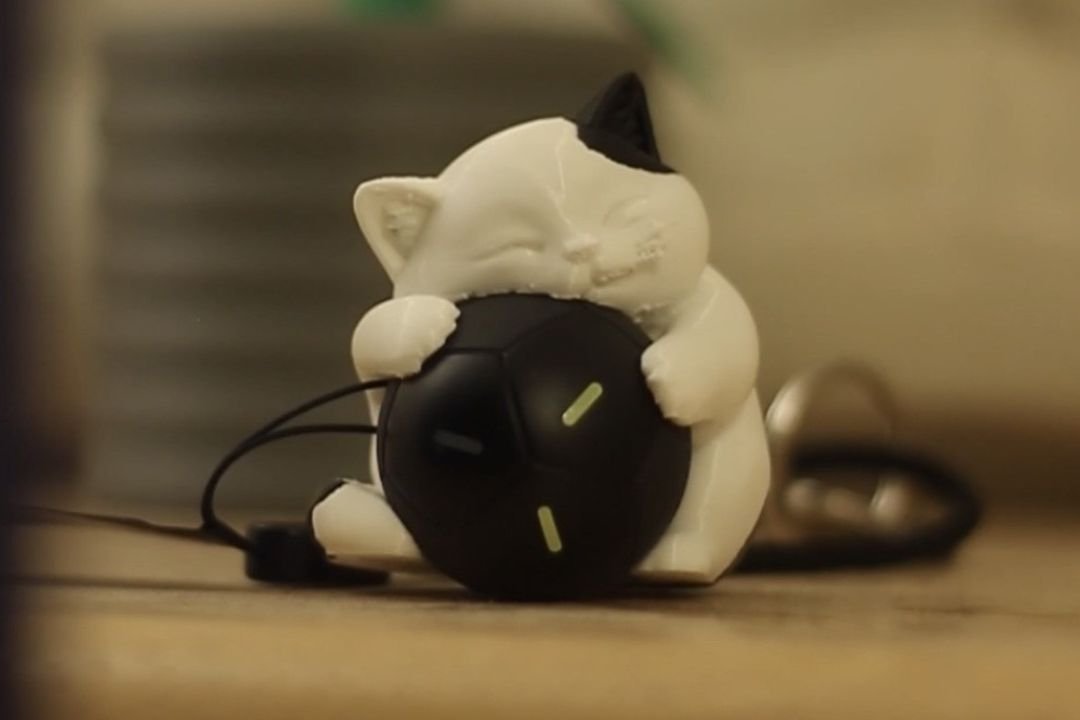
I have a tracker that is shaped like a ball. Instead of making a plain holder for it, I wanted to make something cuter and more fun. The idea was simple: a cat hugging a ball.
The ball in the generated model would act as a placeholder. Later, I could remove that ball in CAD and replace it with the real tracker. So the goal was not just to generate a cute 3D model. The goal was to create something I could actually print and use.
Starting With an Image

At the time I made this project, Hi3D still did not have its own image generation function. So I first asked ChatGPT to create an image of a cat hugging a ball. That image became the input for Hi3D.
Side note: Hi3D now has an image generation function, so today this workflow can be even simpler. Instead of generating the image using another tool first, you can start the visual concept inside Hi3D before generating the 3D model.
Generating the 3D Model in Hi3D
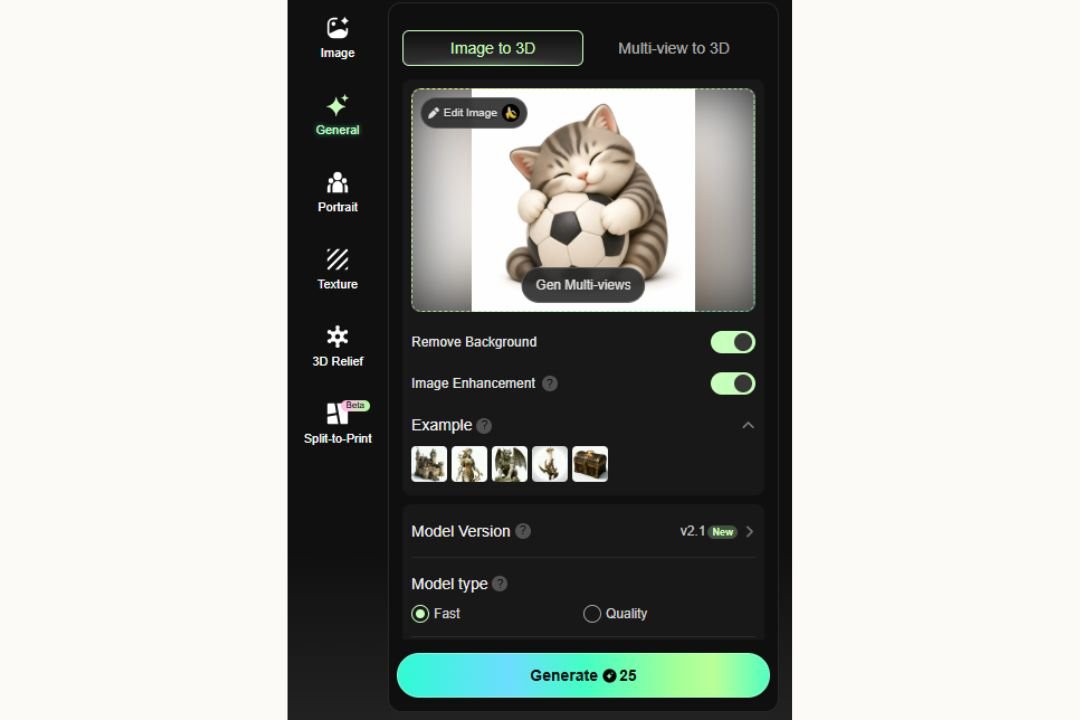
After preparing the image, I uploaded it into Hi3D and let the platform generate the 3D model.
The important part for this project was the pose. The cat needed to look like it was naturally hugging the ball, because that empty space would later hold the real tracker.
For this type of design, modeling everything manually would take much longer. The cat has organic curves, small details, and a pose that needs to feel natural. Hi3D helped me skip a large part of that early modeling work.
The generated result was good enough to continue into the next step.
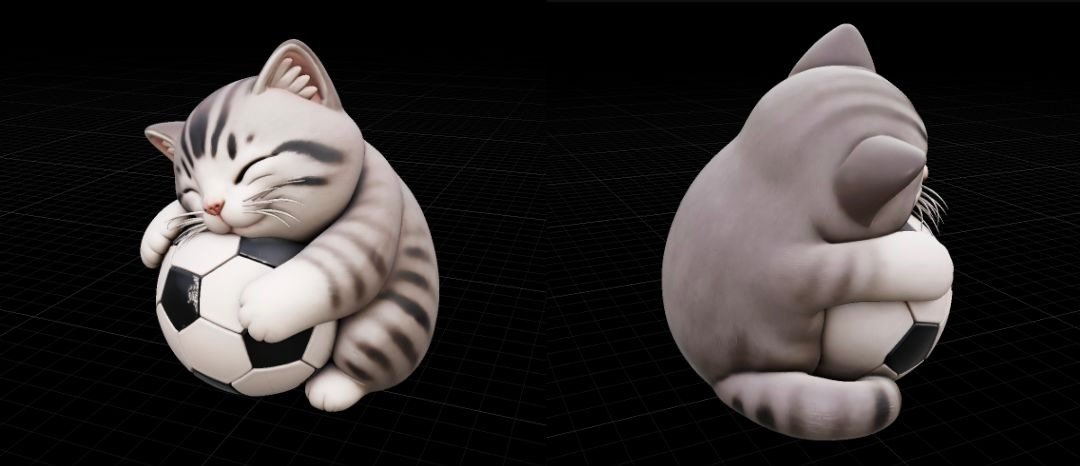
Editing the STL in CAD
After generating the model, I exported it as an STL file.
Since my real tracker already had the ball shape, I did not need the generated ball anymore. So I brought the STL into CAD software and edited the model to remove the ball. This left me with a cat model that still had the hugging pose, but now had space for the real tracker to sit inside.
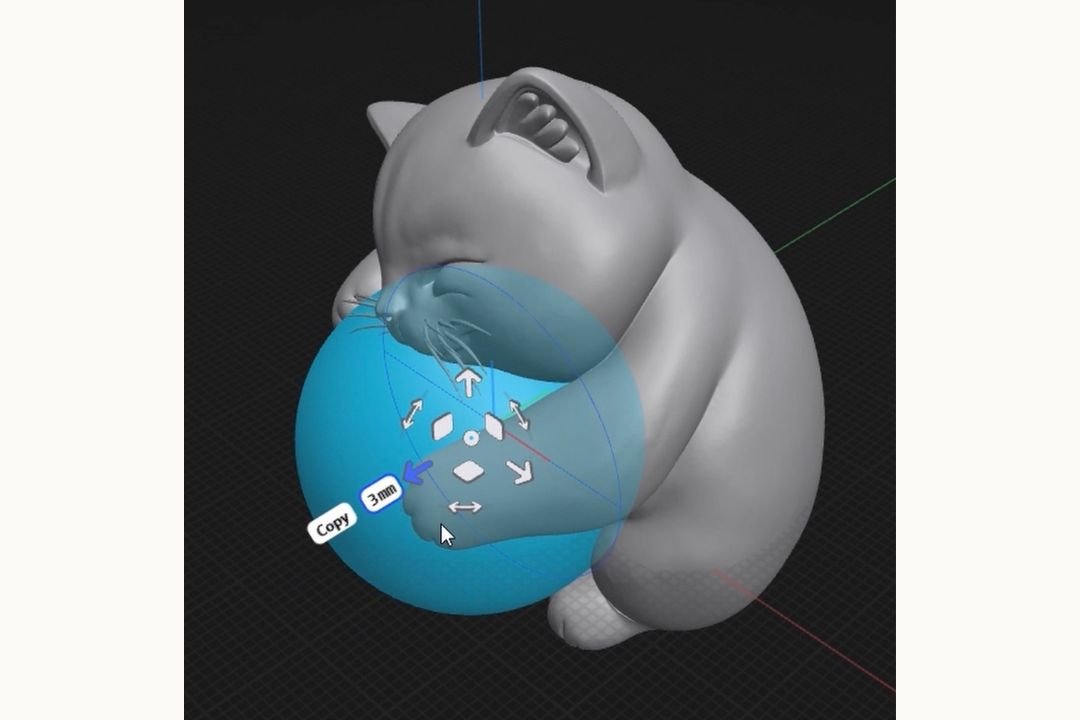
This is an important point. Hi3D did not replace CAD completely. Instead, it gave me a strong starting model, and then I used CAD to make it functional for my exact use case. That is the workflow I personally like: use AI to create the organic shape, then use CAD to adjust the functional part.
Preparing the Print in Bambu Studio
After editing the model, I imported it into Bambu Studio for slicing.
For this print, I used TPU and PLA. TPU is used as the primary material because the cat needed to hold the ball-shaped tracker with some flexibility. A fully rigid holder might be harder to insert or remove, depending on the fit.
The slicing process was straightforward, and the model was printable without needing a complicated cleanup process.
3D Printing the Result
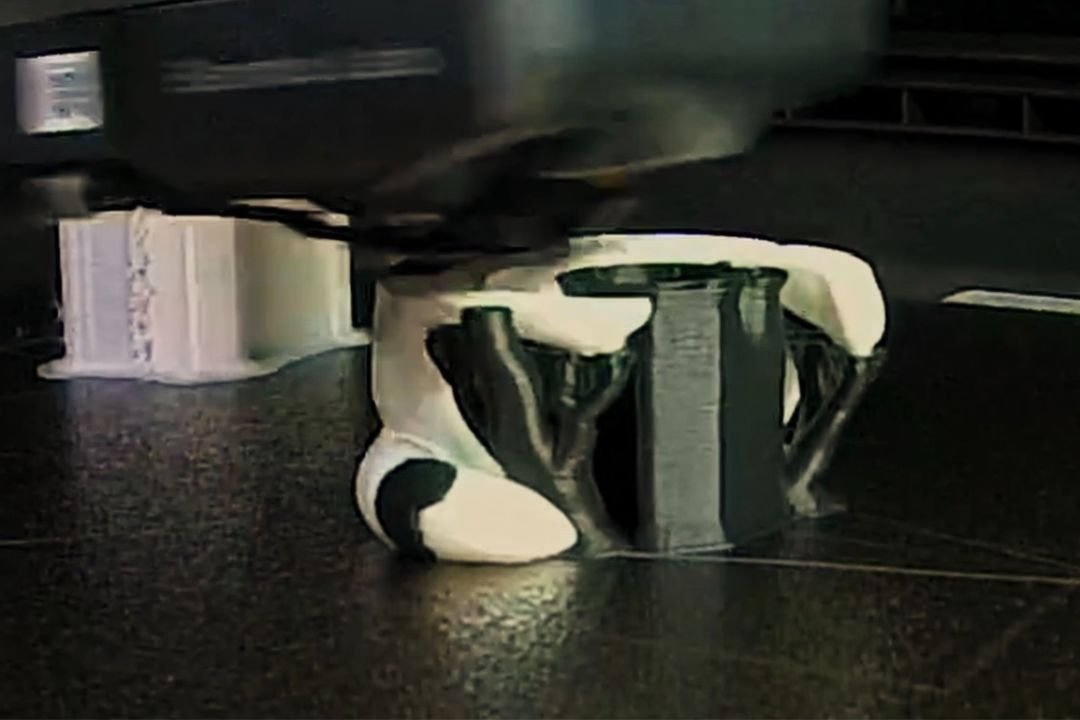
The print went smoothly. More importantly, the result was usable right away. After printing, I placed the ball-shaped tracker into the cat’s hug, and the project was finished.
That is the part that makes this workflow satisfying. The final result was not just a 3D model sitting on a screen. It became a physical object with an actual purpose.
Direct Export to Bambu Studio
For this project, I edited the STL in CAD because I needed to remove the generated ball and fit my real tracker. But if you generate a model that you want to print as it is, Hi3D also gives the option to export the generated model directly to Bambu Studio.
That means the workflow can be shorter: generate the model, export it to Bambu Studio, slice it, and print it.
Of course, I would still recommend checking the model before printing. But having that direct export option makes the process easier, especially for users who do not want to spend too much time moving files between different software.
Updated Features for 3D Printing Users
Hi3D has also started adding more features that are directly relevant to 3D printing workflows.
One of the recently launched features is Split to Print and Intelligent Layout, both of which are helpful for a smoother 3D printing experience.
At the time of writing, Hi3D also mentioned that multi-color printing and templates are expected to launch soon. I have not fully tested those features yet, so I will not comment too much for now. But if they work well, they could be useful for users who want to create more colorful prints or start from ready-made design formats instead of building every concept from zero.
Is an AI Generated Model Perfect?
Not always, and I think that is worth saying directly. AI-generated models can still need cleanup depending on the design. Thin parts, weak contact areas, difficult overhangs, or awkward geometry may still need manual adjustment.
So no, Hi3D does not replace proper CAD or 3D modeling. But for creative objects, decorative models, characters, and simple functional holders, it can reduce a lot of early modeling work.
In this project, I did not need to sculpt a cat from zero. I only needed to generate the base model, edit the part that mattered, and prepare it for 3D printing.
Why This Test Matters
A lot of AI tools can create something that looks impressive in a preview. But for makers, that is not enough.
The real question is: Can you turn it into an STL? Can you edit it? Can you slice it? Can you print it? Can you actually use the result?
For this project, the answer was yes. The process was smooth, and the printed result worked for its intended purpose. That makes Hi3D more than just a visual generation tool. It can be part of a real 3D printing workflow.
Who Is Hi3D Useful For?
Hi3D is useful for creators who already have an idea but do not want to spend too much time modeling the first version manually.
For example: 3D printing hobbyists who want to create cute or decorative models, makers who want to turn a visual idea into a physical object, content creators who need fast concept models, designers who want an organic model as a starting point, and users who are not comfortable with sculpting software.
For technical mechanical parts, I would still use proper CAD. But for creative models and simple functional objects, Hi3D can be a practical shortcut.
Early Verdict
Hi3D is not just useful for generating models that look nice on screen. From this test, it can also help create models that are usable in real life. The cat tracker holder is a simple project, but that is exactly why it is a good example. It is not just a display model. It holds something. It has a purpose. It was printed and used right away.
That is the kind of workflow that matters to me as a 3D printing user.
Final Thoughts
Hi3D is not a replacement for CAD. But it can work very well beside CAD.
For this project, Hi3D handled the organic shape. CAD handled the practical adjustment. Bambu Studio handled the slicing. The 3D printer turned it into a real object.
That combination makes sense.
With features like image generation, Split to Print, Intelligent Layout, and direct export to Bambu Studio, Hi3D is becoming more focused on the full maker workflow, not just the model generation part.
If you have an image, a character idea, or a creative object you want to turn into something physical, Hi3D can make the starting process much faster. Not just generating a model for fun, but getting closer to something you can actually hold and use.
Extra Credits for Domechy Readers
Hi3D also provided an invitation code for Domechy readers who want to try the platform.
You can use the invitation code below to redeem extra credits:
Invitation code: RIDZWAN
If you are planning to test image-to-3D generation for your own 3D printing project, this may be a good way to try the workflow with extra credits first.
Looking to buy a 3D printer in Malaysia?
We’ve put together a curated list of 3D printing shops, filament suppliers, and service providers across Malaysia.
View the directory →
Pingback: Ulasan Hi3D: Bolehkah Model 3D Jana AI Dicetak dan Digunakan? | Domechy